Table of Contents
Documentation
| Topic | Link |
|---|---|
| Getting Started | Getting Started |
| Using the Simulator | Using the Simulator |
| Using Vehicles | Using Vehicles |
| Using Walkers | Using Walkers |
| Sensors | Sensors |
| Data collection | Data collection |
| Creating own maps | Creating own maps |
| Building from source on Linux | Building on Linux |
| Building from source on Windows | Building on Windows |
| Installing on Linux | Installing on Linux |
| Installing on Windows | Installing on Windows |
Creating your own map
This documentation goes through list of things you need add if you wish to create or use your own map but use AGRARSENSE Simulator features.
In order to start creating your own map you need install Agrarsense Simulator from source - Building on Linux or Building on Windows.
To start creating your map quickly, duplicate Empty or Playground level as these levels contain all the needed Actors the simulation needs to work.
All assets such as models and textures found in the AGRARSENSE project are distributed under CC0 License.
Quick way
Duplicate "Empty" map from Content/Agrarsense/Maps folder and rename to it any name you want. Now you can build your own map as you wish and can use all the simulator features. Just check Walkers and Landscape snow setup to make them work properly.
GameMode selection
Change map game mode to AgrarsenseGameModeBase. AgrarsenseGameModeBase.h class handles spawning certain actors when the Simulator starts.

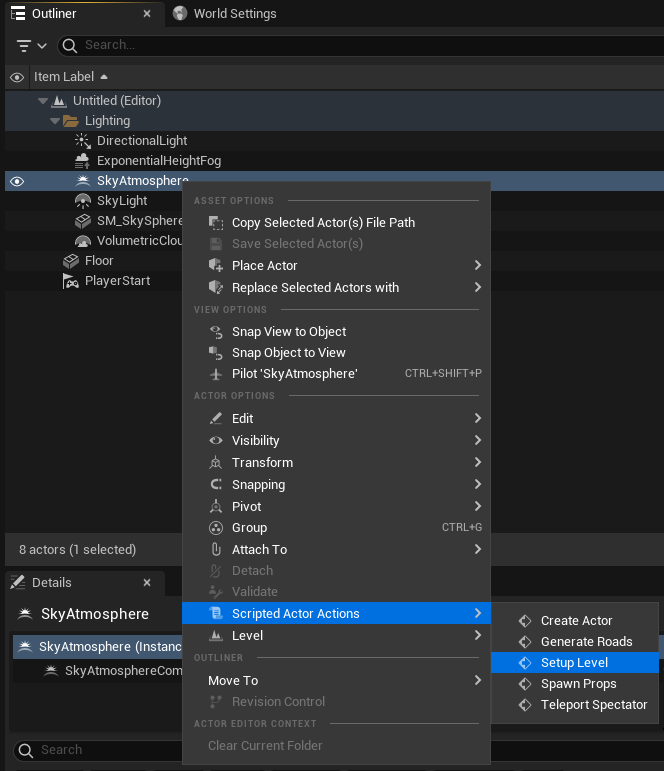
Add needed Actors to the map
In the Outliner right-click any of the actors, and from Scripted Actor Actions submenu choose the "Setup Level" action. This will spawn all necessary actors which are not already in the level.
Placing assets
You can place any assets in the map in the way you want.
However if you are using Agrarsense assets in your own map, prefer to use assets from /Content/Agrarsense/MeshActors instead of meshes directly from the content browser. All these Blueprint assets are automatically instanced by InstancedRenderer using UInstancedStaticMeshComponent when BP_InstancedRendererManager exists in the level. You can also turn all these Actors into ISM instances in Editor to improve level loading performance by running EUW_Agrarsense_editors_tools from Agrarsense/Blueprints/Editor folder and clicking Add existing InstancedActors to InstancedRenderer button.
Note. If you need to use Instance Segmentation Camera, do not use add BP_InstancedRendererManager to the level or make own ISM/HISM components as Instance Segmentation Camera requires each asset to be own static mesh.
Note 2. Instance Segmentation Camera also only works with Nanite enabled meshes. See Sensors for more information.
Walkers
To make the walkers navigation work, add NavMeshBoundsVolume Actor to your level and expand its bounds to fit the entire level.
Landscape snow setup
If your wish to use AGRARSENSE terrain snow system as in RovaniemiForest and Vindeln maps, you need to use have Landscape actor in our map. See RovaniemiForest or Vindeln map for reference.
Setupping the landscape snow using VirtualheightFieldMesh is somewhat complicated but here are the steps:
1) Add RuntimeVirtualTextureVolume Actor to the level 2) Select the Actor and change its Virtual Texture to RVT_VHM_Material 3) To the Bounds Align Actor, select your landscape then click Set Bounds button
4) Add Second RuntimeVirtualTextureVolume Actor to the level 5) Select the Actor and to Bounds Align Actor, select your landscape then click Set Bounds button 6) Select the added actor and change its Virtual Texture to RVT_Height
7) Add VirtualheightFieldMesh Actor to the level 8) Select added RuntimeVirtualTextureVolume Actor and set previously added RuntimeVirtualTextureVolume to Virtual Texture slot and click Copy Bounds 9) Now click Build and save the MinMax texture somewhere in the project. 9) For the VirtualheightFieldMesh Actor select material to M_VHM_Landscape_Inst or create your own material.
10) Go to your Landscape actor and find Draw in Virtual Texture array and add RVT_HVM_Height and RVT_VHM_material to it.
Add map to AgrarsenseSettings.h
In AgrarsenseSettings.h file you need to add map to MapNames and MapPaths TArrays.
Not strictly needed but needed if you want to be able to use ROS command "ChangeMap" command.
Your map in packaged build
To include your map in packaged build you need to open Project Settings and type maps to the search bar and modify following options:
Game Default Map - MyLevel
Transition Map - MyLevel
Server Default Map - MyLevel
List of maps to include in a packaged build - MyLevel map path
Note. If you wish to keep MainMenu as Game Default Map, you need to create new button to WBP_MaineMenu to be able to transition to MyLevel. Follow the blueprint logic how to transition to MyLevel map.
