Table of Contents
Documentation
| Topic | Link |
|---|---|
| Getting Started | Getting Started |
| Using the Simulator | Using the Simulator |
| Using Vehicles | Using Vehicles |
| Using Walkers | Using Walkers |
| Sensors | Sensors |
| Data collection | Data collection |
| Creating own maps | Creating own maps |
| Building from source on Linux | Building on Linux |
| Building from source on Windows | Building on Windows |
| Installing on Linux | Installing on Linux |
| Installing on Windows | Installing on Windows |
Prerequisites
In this section, you will find essential information regarding the system requirements, software installations, and other dependencies necessary before starting the development of AGRARSENSE.
The project directory structure is as follows:
System Recommendation
- 9th gen Intel i5/i7/i9 or newer / 2nd gen AMD Ryzen 5/7/9 or newer
- 16+ GB RAM or more
- NVIDIA RTX-2000 series or newer.
- AMD RX-6000 series or newer.
- Intel Arc A-Series Graphics Cards or newer.
- 150+ GB disk space for source version
- 10+ GB disk space for packaged version
- Windows 10 / Windows 11
Quick Guide
- Install Unreal Engine 5.6 from Epic Games launcher or follow Unreal Engine section to install AGRARSENSE fork of the Engine (preferred). Note if you use Unreal Engine 5.6 from Epic games launcher Instance segmentation camera doesn't work, as well some of our other engine related optimizations are not present.
- Clone AGRARSENSE repository
- Compile and open the project:
- Optional: Install ROS, follow ROS related installations section
Unreal related installations
Visual Studio
Get the Visual Studio 2022 from here. Choose Community for the free version. If you own Visual Studio Professional licence then use that instead. Use the Visual Studio Installer to install following elements:
- __.NET dekstop Development. . In the Workloads section, choose __.NET dekstop Development__
- Universal Wndows Platform Development. . In the Workloads section, choose __Universal Wndows Platform Development
- Desktop development with C++. In the Workloads section, choose __Desktop development with C++
- Game development with C++. In the Workloads section, choose __Game development with C++
You also need .NET 6.0 SDK, this might already be installed or may come installed with Visual Studio but in case it's not, .NET 6.0 SDK can be downloaded from Microsoft website Windows x64 installer
Unreal Engine
You can either install Unreal Engine 5.6 from Epic Games launcher, or you can install our fork of the Unreal Engine which is preferred.
We have made our own fork of the Unreal Engine where we have made few optimizations to the engine to improve sensors performance.
Note. Compiling engine from source takes ~1-5 hours depending on your hardware. If are just testing the Simulator quickly, download Unreal Engine 5.6 from the Epic Games launcher to save time and skip to Part Two: Build AGRARSENSE
To install our fork of the engine, you need to have a GitHub account linked to Unreal Engine's account.
To build the modified version of Unreal Engine:
1. Clone the repository
Note: If you clone the engine to other than C:\UnrealEngine, you need to modify Compile.bat, OpenProject.bat and Package.bat scripts because these scripts assume the engine is located in C:\UnrealEngine. If you are using Unreal Engine from Epic Games launcher then you don't need to do anything.
2. Navigate to cloned folder:
3. Run the configuration scripts::
4. Compile the modified engine:
>1. Open the UE5.sln file inside the source folder with Visual Studio 2019.
>2. In the build bar ensure that you have selected 'Development Editor' and 'Win64' options.
>3. In the solution explorer, right-click UE5 and select Build.
Clone & Build AGRARSENSE
1. Clone the repository
2. Navigate to AGRARSENSE Unreal project folder (Command Prompt and File Explorer)
3. Generate Visual Studio project files
4. Build AGRARSENSE
To compile and open the Unreal Editor with one command. Requires Unreal Engine and Visual Studio 2022 to be installed.
This .bat script can be started either by double clicking it or running it from command line.
Alternatively if you just want to compile the C++ source and plugins:
ROS related installations
Installing Ubuntu WSL on Windows
Ubuntu WSL is required for the project to be able to communicate between Unreal Engine and ROS.
AGRARSENSE Unreal project will work without a ROS installation but you cannot get or send any data to or from the simulator.
WSL can be installed either from the Microsoft Store (as of November 2022), or from the command line. If installing from the command line won't work, try installing from the Microsoft Store.
Install Ubuntu WSL by putting this command in command prompt.
```sh
wsl --install -d Ubuntu-20.04
```
You can now Launch Ubuntu WLS from start menu or with wsl command to command prompt
Install ROS noetic on WSL Ubuntu
When WSL installation is ready, follow this guide to install ROS.
Install ROSBridge on WSL Ubuntu
https://github.com/code-iai/ROSIntegration states this:
The recommended way to install rosbridge is from source (requires the rosauth package) – Even though you could install rosbridge using apt, there have been numersous issues where these apt packages do not reflect the code in the ros1 branch. Hence, it is best to install from source.
Install from apt packages:
When launching ROS server, you can either launch it manually from Ubuntu WSL Terminal
or in windows terminal
To run python scripts with ROS connection you need to install Python ROS packages:
If connection doesn't go through from windows to Ubuntu WSL, you need to set **"ROS_IP"** in command prompt.
When ROS is installed follow this guide to install ROS2 (Foxy).
First, you need to install ROS2 without ros1_bridge.
First Launch new terminal and do following:
After ROS2 is build from source (without ros1_bridge), You need to 'source' both ROS1 and ROS2.
then build only ros1_bridge
NOTE: To use ROS1 rosbridge_server, you shouldn't add both ROS1 and ROS2 to ~.bashrc, since it mixes the packages. Instead, use ROS1 as intended and source ROS2 ONLY when needed
By typing ROS2 in terminal, it sources the ROS2 bash file and removes ROS2 alias
Using & testing AGRARSENSE
To test everything works correctly you can the following:
Note. On Windows steps 2 and 3 might be redundant as the Simulator will attempt to launch both ROS1 and ROS2 automatically but you can also start the ROS1 and ROS2 yourself and keep the them active all the time. This allows Simulator to conencted to ROS faster.
- Launch Unreal Editor with below command.
- Start ROS1 in Ubuntu WSL
- Start ROS1 to ROS2 Bridge with new Ubuntu WSL terminal
- In Unreal Editor navigate to
Content/Agrarsense/Maps/SensorShowCaseand open SensorShowCaseMap - Press play
- Spawn wanted sensors through the user interface
- Open new Ubuntu WSL terminal and type following command to see all current ROS topics
if you see sensors creating new ROS topics then everything is working correctly.
Creating packaged build
To create packaged shipping build, you can either:
A. Create package without opening the Unreal Editor with following command. This script packages the project into ./Build folder
B. Or launch the Unreal Editor with following command and create the package in the Unreal Editor.
Maps to include in the packaged build is defined in DefaultGame.ini file.
Modifying AGRARSENSE source
When modifying Blueprints or Widget Blueprints in Unreal Editor, simply click compile and save in the Unreal Editor as in with any Unreal project.
When modifying AGRARSENSE Unreal project C++ source or plugins C++ source, you must close the Unreal Editor, compile C++ and then open the Unreal Editor again or else changes will not take effect. This can be done with same scripts as above.
Note. Unreal Engine does support compiling C++ in Unreal Editor through Live Coding but your experience may vary depending what piece of code you work on.
To compile and open the Unreal Editor with one command:
To just compile C++ source and plugins
Compiling in Visual Studio
Keeping AGRARSENSE updated
To keep AGRARSENSE updated, open file explorer at Agrarsense/Unreal/Agrarsense/ and double clickUpdate.bat or open terminal at that location and type:
This bat script simply pulls the git repository. You can achieve the same by opening command line at Agrarsense root directory and typing git pull or use any Git GUI application such as Github Desktop and keep repository updated through it.
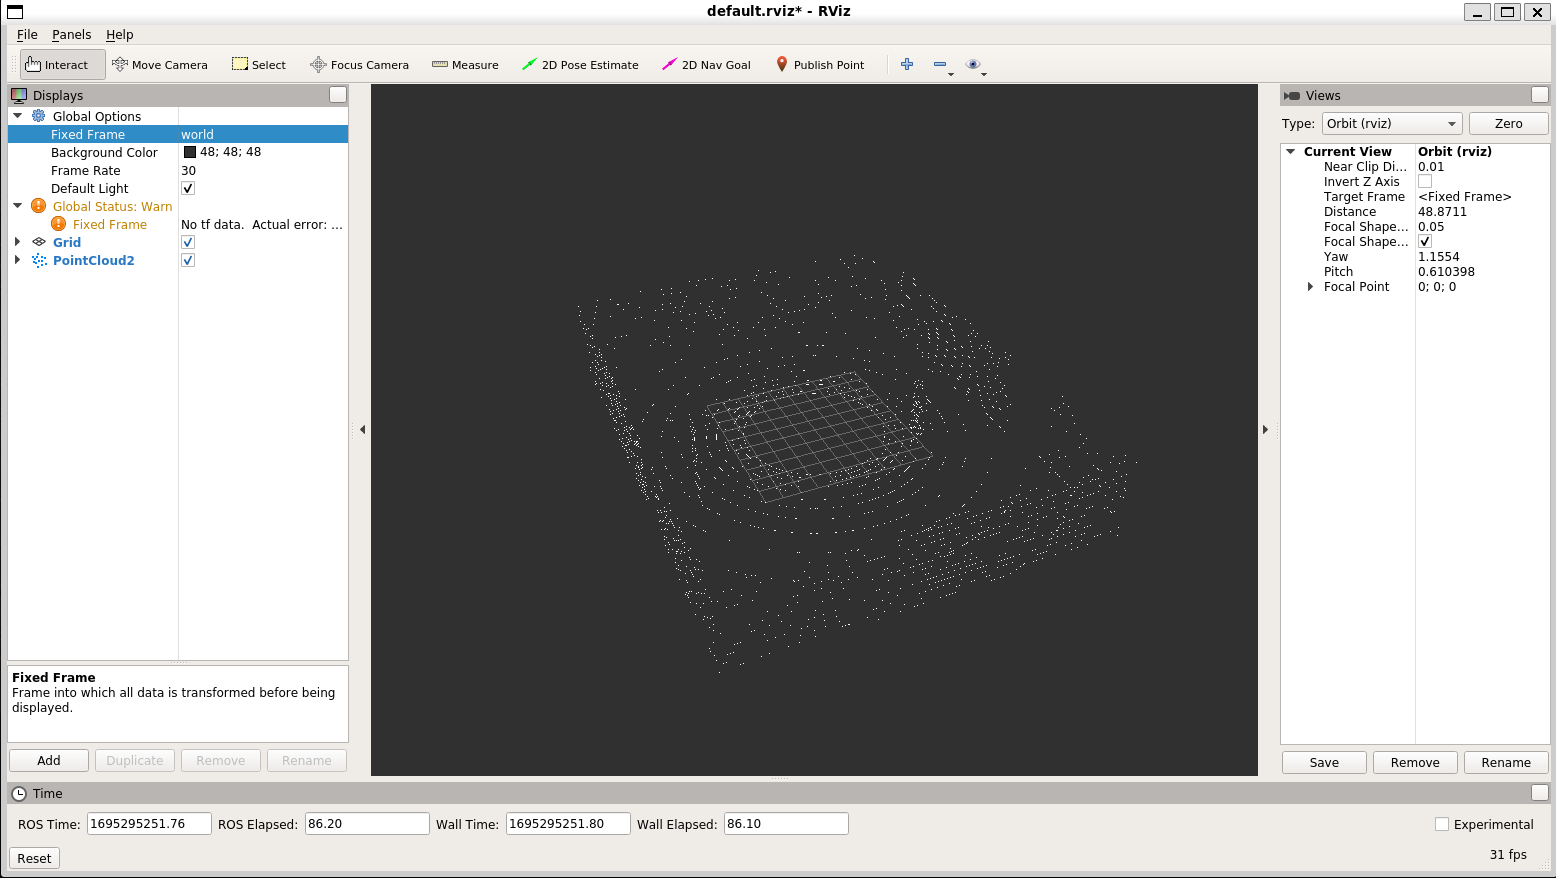
Visualizing sensor output with rviz
rviz is short for ROS Visualization. It's easy way visualize ROS messages, for example camera images and Lidar pointclouds.
- First follow Testing AGRARSENSE
- Open new Ubuntu WSL and launch rviz
If you get 'Could not connect to any X display' error, you may need to install Xming.
First download and install Xming. After installing start the Xming program.
Now open new Windows termianl and type
Now go back to Ubuntu WSL terminal and type
Where <Windows-IP> is your computer IP. For example:
After setting the IP, you should be able to launch rviz with
- Now that rviz is open click 'Add' from the bottom left corner. This opens new window. In the window click 'By topic' tab. This tab should show all topics that rviz is able to visualize. For example if you have Lidar sensor active in the simulation, you should see /Agrarsense/Sensors/Lidar0/PointCloud2. Select that and click ok.
- Click 'Fixed Frame' and rename it to world and you should now see Lidar sensor pointcloud being visualized.
Accessing simulator data with Python on Windows
To interact with the simulator and transfer data, you need to install ROS Noetic on Windows and use the x64 Native Tools Command Prompt for Visual Studio 2022.
- Install ROS Noetic to Windows using this guide, but instead of Visual Studio 2019, use Visual Studio 2022.
- Open the Start Menu and search for x64 Native Tools Command Prompt for VS 2022
- in the command prompt, run the following commands: cd C:\opt\ros\noetic\x64 && setup.bat && cd C:\Agrarsense\Examples\ROS1
- Install the required Python dependencies by running: pip install -r requirements.txt
- Finally, run any script found in the directory. For example, rgb_camera.py, which listens to the RGB camera sensor's ROS topic and visualizes the captured image. Ensure that the RGB camera has been successfully spawned before running the script.