Documentation
Spawning vehicles
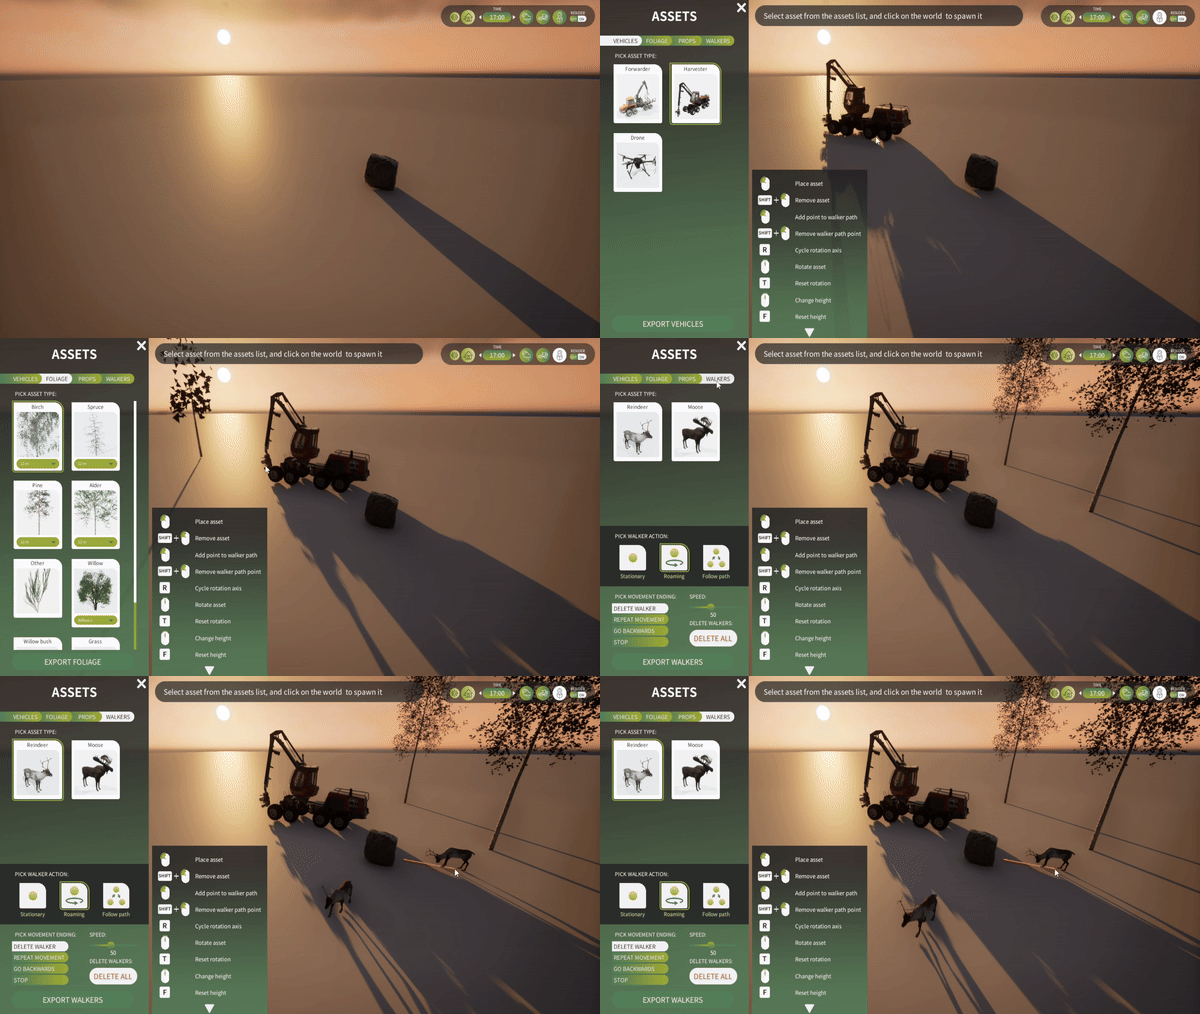
Spawning vehicles through User Interface
- Open Asset Placement tool
- Select vehicle from the Vehicles-tab
- Select position you want vehicle to be spawned

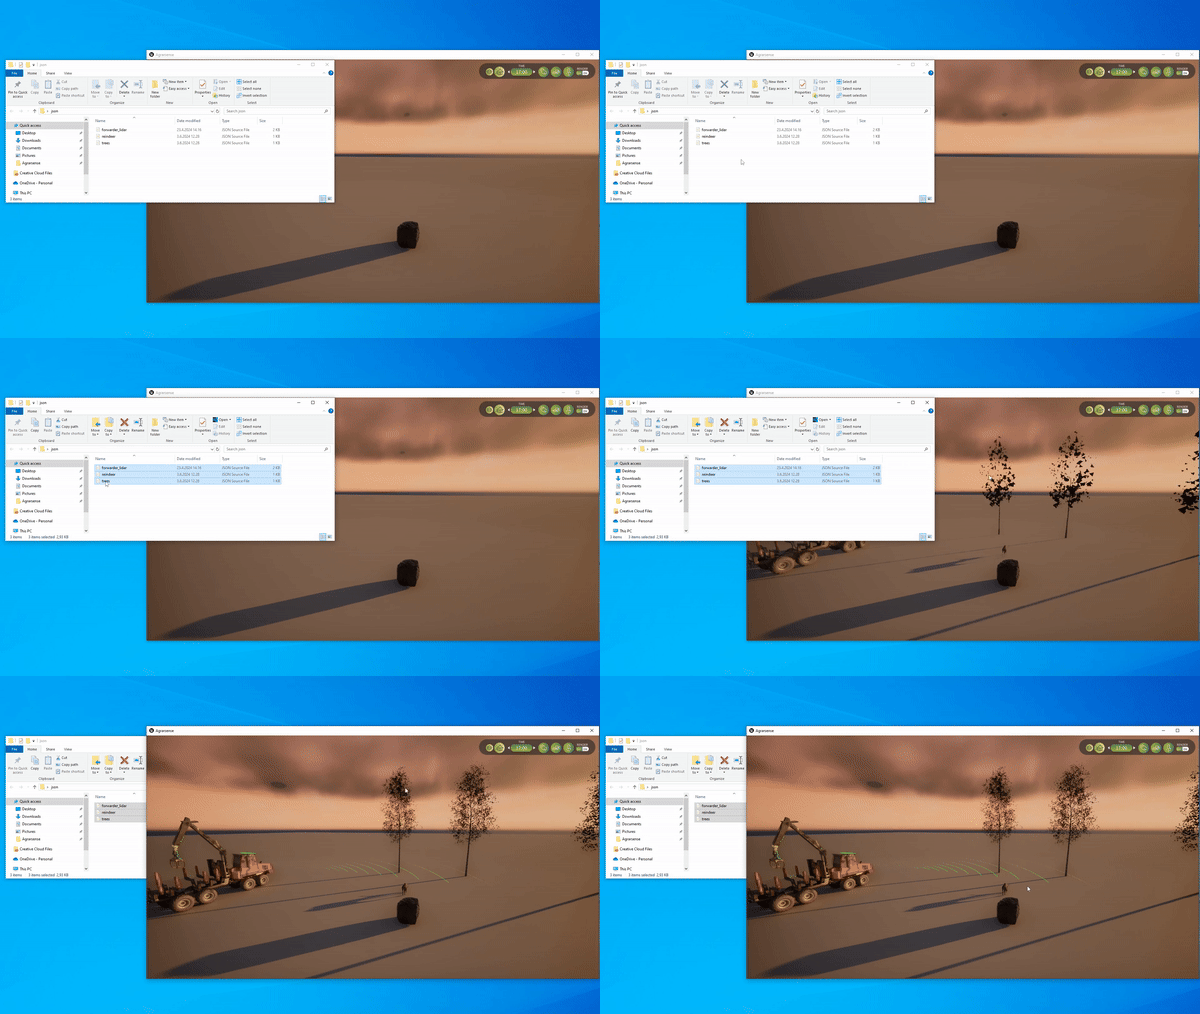
Spawning Vehicles through json drag and drop
Drag and drop wanted json files or json files into the simulator window.

Spawning Vehicles through ROS
To spawn vehicle with or without sensors, you can utilize ROS Commands topic SpawnObjects {full_path.json} ROS Command.
# ROS1
rostopic pub /agrarsense/in/commands std_msgs/String "SpawnObjects C:/Agrarsense/Examples/ExampleJsonFiles/forwarder.json" --once
# ROS2
ros2 topic pub /agrarsense/in/commands std_msgs/String "data: SpawnObjects D:/Work/Agrarsense/Agrarsense/Examples/ExampleJsonFiles/forwarder.json" --once
With this command, the simulator loads and parses the .json file and if successfull, vehicle is spawned with sensor(s) if defined. Example .json file structure below. To ensure your JSON file is properly structured for Forwarder spawning, you can refer to our example JSON files.
Vehicle json structure
Forwarder and harvester
{
"objects": [
{
"type": "vehicle",
"model": "Forwarder", # or harvester
"id": "forwarder", # or harvester
"teleportSpectator": false,
"followObject": false,
"destroyOverlappingObjects": true,
"spawnPoint": {
"x": 0.0,
"y": 0.0,
"z": 200.0,
"roll": 0.0,
"pitch": 0.0,
"yaw": 0.0
},
"parameters":
{
"mass": 10500.0,
"treeInstanceToActorOnOverlap": false,
"hasBoomArm": true,
"allowBoomMovement": true,
"OverlapRadiusMeters": 50.0,
"visualizeOverlap": false,
"cargoLoad": "empty" # Empty, Half, Full
}
}
]
}
Drone
{
"objects": [
{
"type": "vehicle",
"model": "Drone",
"id": "drone",
"teleportSpectator": false,
"followObject": false,
"zIsHeightAboveGround": false,
"hideVehicleMeshForCameras": false,
"spawnPoint": {
"x": 0.0,
"y": 0.0,
"z": 200.0,
"roll": 0.0,
"pitch": 0.0,
"yaw": 0.0
},
"parameters": {
"droneAction": "Stationary",
"droneEndAction": "Stop",
"collisionsEnabled": true,
"overlapRadiusMeters": 25.0,
"createInnerOverlapSensor": true,
"innerOverlapRadiusMeters": 8.0,
"visualizeOverlap": false,
"showForwardArrow": false,
"droneSlowToPointModifier": 1.0
}
}
]
}
Forwarder & Harvester
Driving Forwarder & Harvester manually
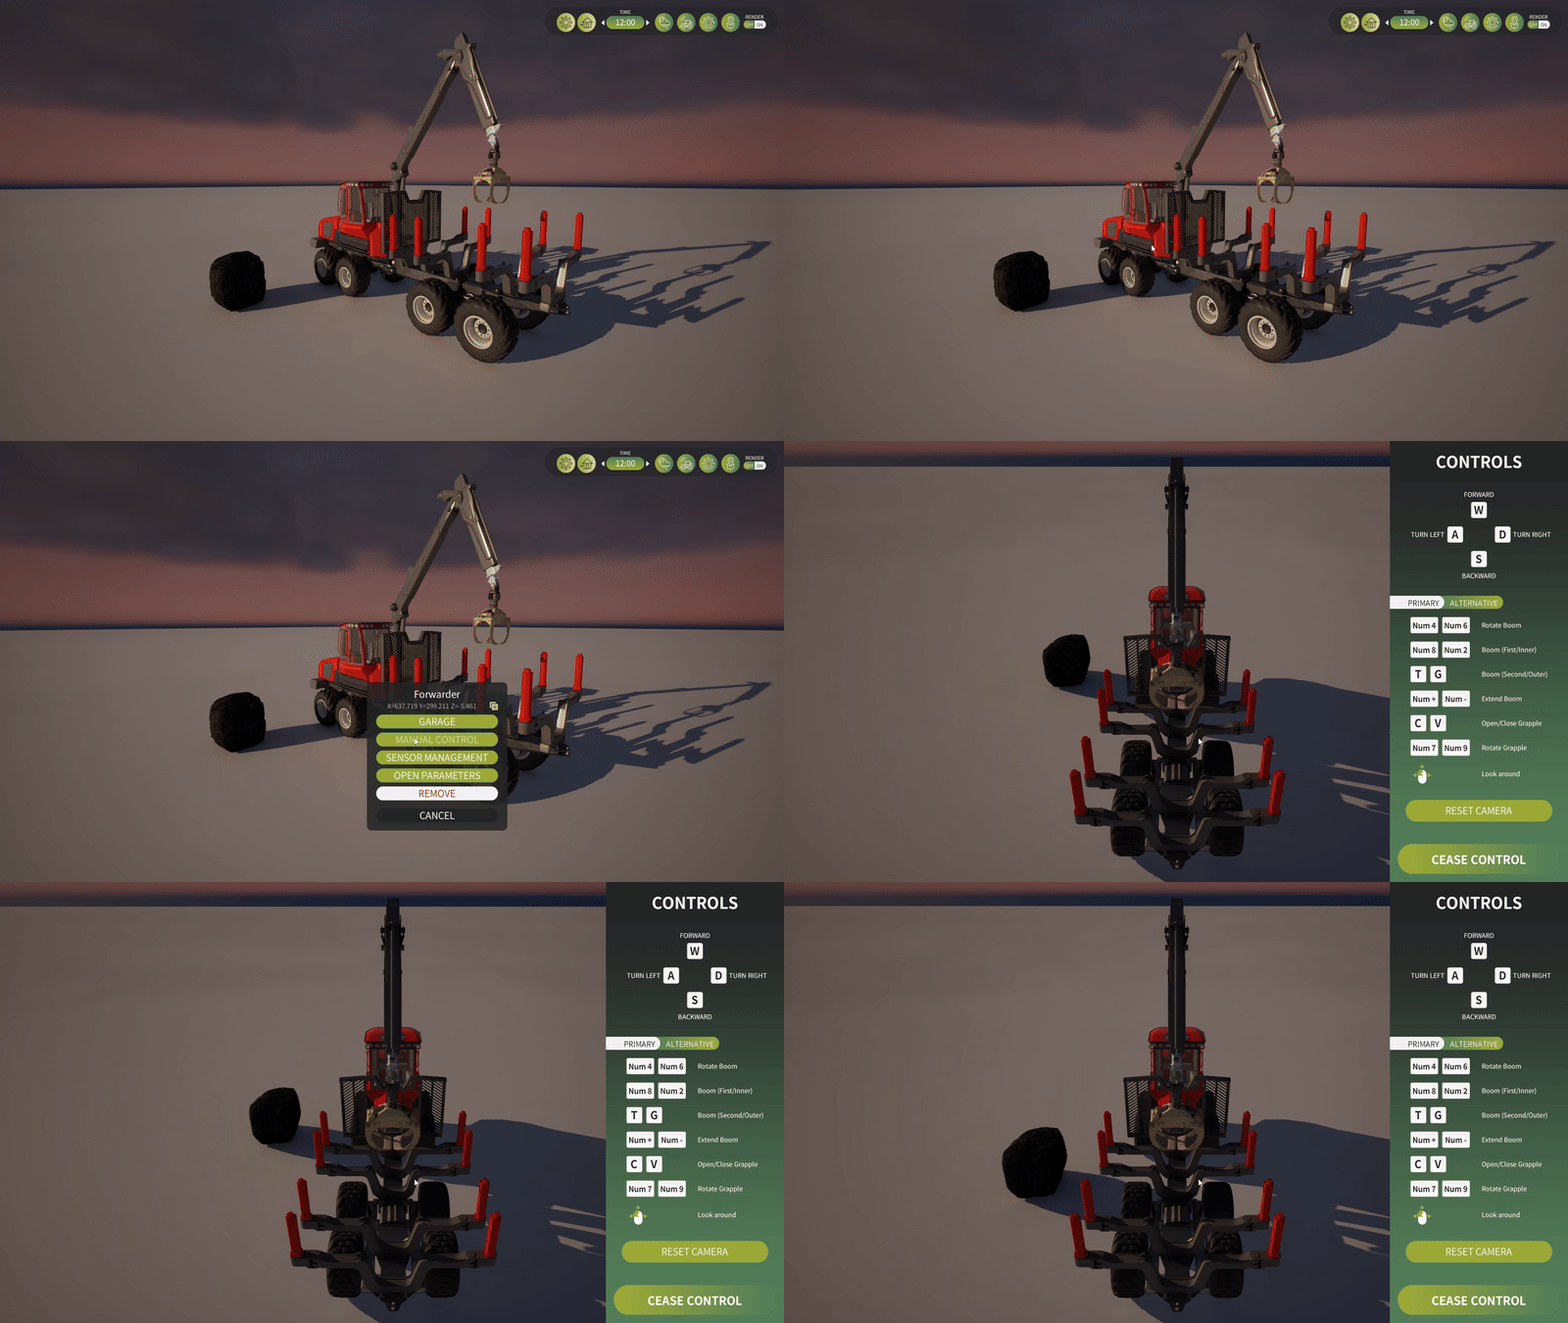
Spawn vehicle either through user interface or ROS. Then right click vehicle and select 'Manual Control' from the context menu. This will attach Spectator camera to the vehicle and allows you drive the vehicle manually.

Inputs for driving forward is WASD
W = Forward
S = Backward / break

A = Turn left
D = Turn right
Inputs for the boom is assigned to the numpad and letter keys:
Numpad 2 / I = whole boom up
Numpad 8 / K = whole boom down

Numpad / T = reaching boom up
Numpad / G = reaching boom down

Numpad 4 / J = whole boom left
numpad 6 / L = whole boom right

Numpad + / U = Extension boom out
numpad - / O = Extension boom in
Forwarder & Harvester ROS topics
Each Forwarder/Harvester publishes several ROS topics:
# Query all ROS topics
rostopic list
# Out ROS topic that publishes overall transform of the forwarder
/agrarsense/out/sensors/forwarder/transform
# Out ROS topic that publishes general GPS data of the forwarder
/agrarsense/out/sensors/forwarder/navsatfix
# Out ROS topic that publishes transform (position & orientation) from the axle sensor
/agrarsense/out/sensors/forwarder/axle/transform
# Out ROS topic that publishes GPS data from the axle sensor
/agrarsense/out/sensors/forwarder/axle/navsatfix
# Out ROS topic that publishes transform (position & orientation) from the front sensor
/agrarsense/out/sensors/forwarder/front/transform
# Out ROS topic that publishes GPS data from the front sensor
/agrarsense/out/sensors/forwarder/front/navsatfix
# Out ROS topic that publishes transform (position & orientation) from the rear sensor
/agrarsense/out/sensors/forwarder/rear/transform
# Out ROS topic that publishes GPS data from the rear sensor
/agrarsense/out/sensors/forwarder/rear/navsatfix
# Out ROS topic that publishes collision events of the forwarder
/agrarsense/out/sensors/forwarder/collision
# Out ROS topic that publishes overlap events (e.g., when overlapping with objects)
/agrarsense/out/sensors/forwarder/overlap
Driving the Forwarder & Harvester through ROS
- Send message to
Agrarsense/in/Vehicles/VEHICLE_ID/Movement to start moving the vehicle.
To control the vehicle, you can send movement commands to the topic agrarsense/in/vehicles/VEHICLE_ID/movement.
The vehicle keeps following the last command until a new one is sent.
Command Breakdown:
[Throttle, Break, Steering]
Throttle controls Throttle, with a value range between -1.0 and 1.0:
-1.0 drives the vehicle backward at the highest acceleration.1.0 drives the vehicle forward at the highest acceleration.
Break controls vehicle break input, with value range between 0 and 1Steering controls the steering angle, with a value range between -45 and 45 degrees.
Examples:
- To drive the vehicle forward at the highest acceleration and straight:
# [1.0, 0, 0]
rostopic pub /agrarsense/in/vehicles/VEHICLE_ID/movement std_msgs/String "1,0,0"
- To drive the vehicle backwards at the highest acceleration and straight:
# [-1.0, 0, 0]
rostopic pub /agrarsense/in/vehicles/VEHICLE_ID/movement std_msgs/String "-1,0,0"
- To drive the vehicle forward at moderate acceleration and turn right:
# [0.5, 0, 45]
rostopic pub /agrarsense/in/vehicles/VEHICLE_ID/movement std_msgs/String "0.5,0,45"
- To drive the vehicle forward at moderate acceleration and turn left:
# [0.5, 0, -45]
rostopic pub /agrarsense/in/vehicles/VEHICLE_ID/movement std_msgs/String "0.5,0,-45"
- Stop movement
# [0, 0, 0]
rostopic pub /agrarsense/in/vehicles/VEHICLE_ID/movement std_msgs/String "0,0,0"
# or by with breaks
# [0, 1, 0]
rostopic pub /agrarsense/in/vehicles/VEHICLE_ID/movement std_msgs/String "0,1,0"
# VEHICLE_ID can be setup manually when spawning objects through JSON
# If ID is not setup then ID will be 'forwarder' for first forwarder then 'forwarder1',
# 'forwarder2' and so on.
# Same applies to other vehicles: 'harvester', 'harvester1', 'harvester2'
# and drone, drone1, drone2 and so on.
rostopic pub /agrarsense/in/vehicles/VEHICLE_ID/movement std_msgs/String [0,1,0] [0,0,0]
rostopic pub /agrarsense/in/vehicles/VEHICLE_ID/movement geometry_msgs/Twist [0,0.5,0] [0,0,0]
# Driving forward:
rostopic pub /agrarsense/in/vehicles/forwarder/movement std_msgs/String "1.0, 0, 0"
# Stationary / no input:
rostopic pub /agrarsense/in/vehicles/forwarder/movement std_msgs/String "0, 0, 0"
# Driving backwards:
rostopic pub /agrarsense/in/vehicles/forwarder/movement std_msgs/String "-1.0, 0, 0"
# Breaking
rostopic pub /agrarsense/in/vehicles/forwarder/movement std_msgs/String "0, 1.0, 0"
# Example of driving forward and turning right:
rostopic pub /agrarsense/in/vehicles/forwarder/movement std_msgs/String "1.0, 0, 45.0"
# Example of driving forward and turning left:
rostopic pub /agrarsense/in/vehicles/forwarder/movement std_msgs/String "1.0, 0, -45.0"
Controlling Forwarder & Harvester arm through ROS
- Continuous message to agrarsense/in/vehicles/VEHICLE_ID/boom_movement (Twist message)
- Boom movement is divided in 2 sections, Angular and Linear
- Angular is for the main boom
Linear is for the grapple & Extended boom
Breakdown:
Linear.x = Boom extension in, out Linear.y = Grapple open, close (value = degrees) Linear.z = grapple rotation left, right (value = degrees)
Angular.x = Outerboom movement up, down (value = degrees) Angular.y = Innerboom movement up, down (value = degrees) Angular.z = Whole boom rotation left, right (value = degrees)
Example of rotating the whole boom:
rostopic pub /agrarsense/in/vehicles/forwarder/boom_movement geometry_msgs/Twist [0,0,0] [0,0,1] -r 30
This has to be continuous movement in order to rotate the boom 1 degrees in every tick.
Adding Sensors to Forwarder/Harvester
You can add Sensors to Forwarder and Harvester via user interface, which you can then save into preset (shows in garage preset) or export into .json file so it can be re-used easily without needing to setup the vehicle each time.
1) Spawn Forwarder/Harvester via user interface or via ROS.
2) Right click the Forwarder/Harvester and context menu should appear.
3) Click "Move to Garage"
4) Setup sensors in "Garage". Check Setup Sensors on how to setup the sensors.
5) To export Forwarder/Harvester and its sensor(s) click Export.
.json file will be exported to SIMULATION_ROOT/Data/ExportedJsonFiles/ and it will look something like below.
Note. You can also export vehicle to json through vehicle "Open Parameters menu".
{
"objects": [
{
"type": "vehicle",
"model": "Forwarder",
"teleportSpectator": false,
"followObject": true,
"destroyOverlappingObjects": true,
"spawnPoint": {
"x": 801.81213642853379,
"y": -1998.7911836034978,
"z": 4.6668885864991125,
"roll": 0.0034698484636624624,
"pitch": 1.2947014081437904,
"yaw": -0.00095361222054179962
},
"parameters":
{
"mass": 10500.0,
"treeInstanceToActorOnOverlap": false,
"hasBoomArm": true,
"allowBoomMovement": true,
"OverlapRadiusMeters": 50.0,
"visualizeOverlap": false
},
"sensors": [
{
"type": "sensor",
"model": "RGBCamera",
"name": "rgbcamera",
"spawnPoint": {
"x": 428.24285827225685,
"y": -174.3420693053049,
"z": 386.51402282714844,
"roll": -0,
"pitch": 0,
"yaw": 0
},
"parameters": {
"postProcessingEffects": true,
"enable16BitFormat": true,
"useHDR": false,
"width": 1280,
"height": 720,
"maxViewDistanceInCmOverride": -1.0,
"fOV": 90,
"targetGamma": 1,
"shutterSpeed": 60,
"iSO": 100,
"focalDistance": 0,
"depthBlurAmount": 1,
"depthBlurRadius": 0,
"dofMinFStop": 1.2,
"dofBladeCount": 5,
"filmSlope": 0.88,
"filmToe": 0.55,
"filmShoulder": 0.25,
"filmBlackClip": 0,
"filmWhiteClip": 0.04,
"exposureMinBrightness": -2,
"exposureMaxBrightness": 20,
"exposureSpeedUp": 10.0,
"exposureSpeedDown": 1,
"motionBlurIntensity": 0.0,
"motionBlurMax": 2,
"motionBlurMinObjSize": 0,
"lensFlareIntensity": 0.0,
"bloomIntensity": 0,
"whiteTemp": 6500,
"whiteTint": 0,
"chromAberrIntensity": 0,
"chromAberrOffset": 0,
"aperture": 4,
"saveImageToDisk": true,
"sendDataToROS": true,
"targetFrameRate": 0,
"usePhysicLensDistortionEffect": true,
"useIceLensEffect": false,
"iceLensEffectStrength": 0.3,
"iceLensEffectAngle": 1.0
}
}
]
}
]
}
Drone
Driving Forwarder & Harvester manually
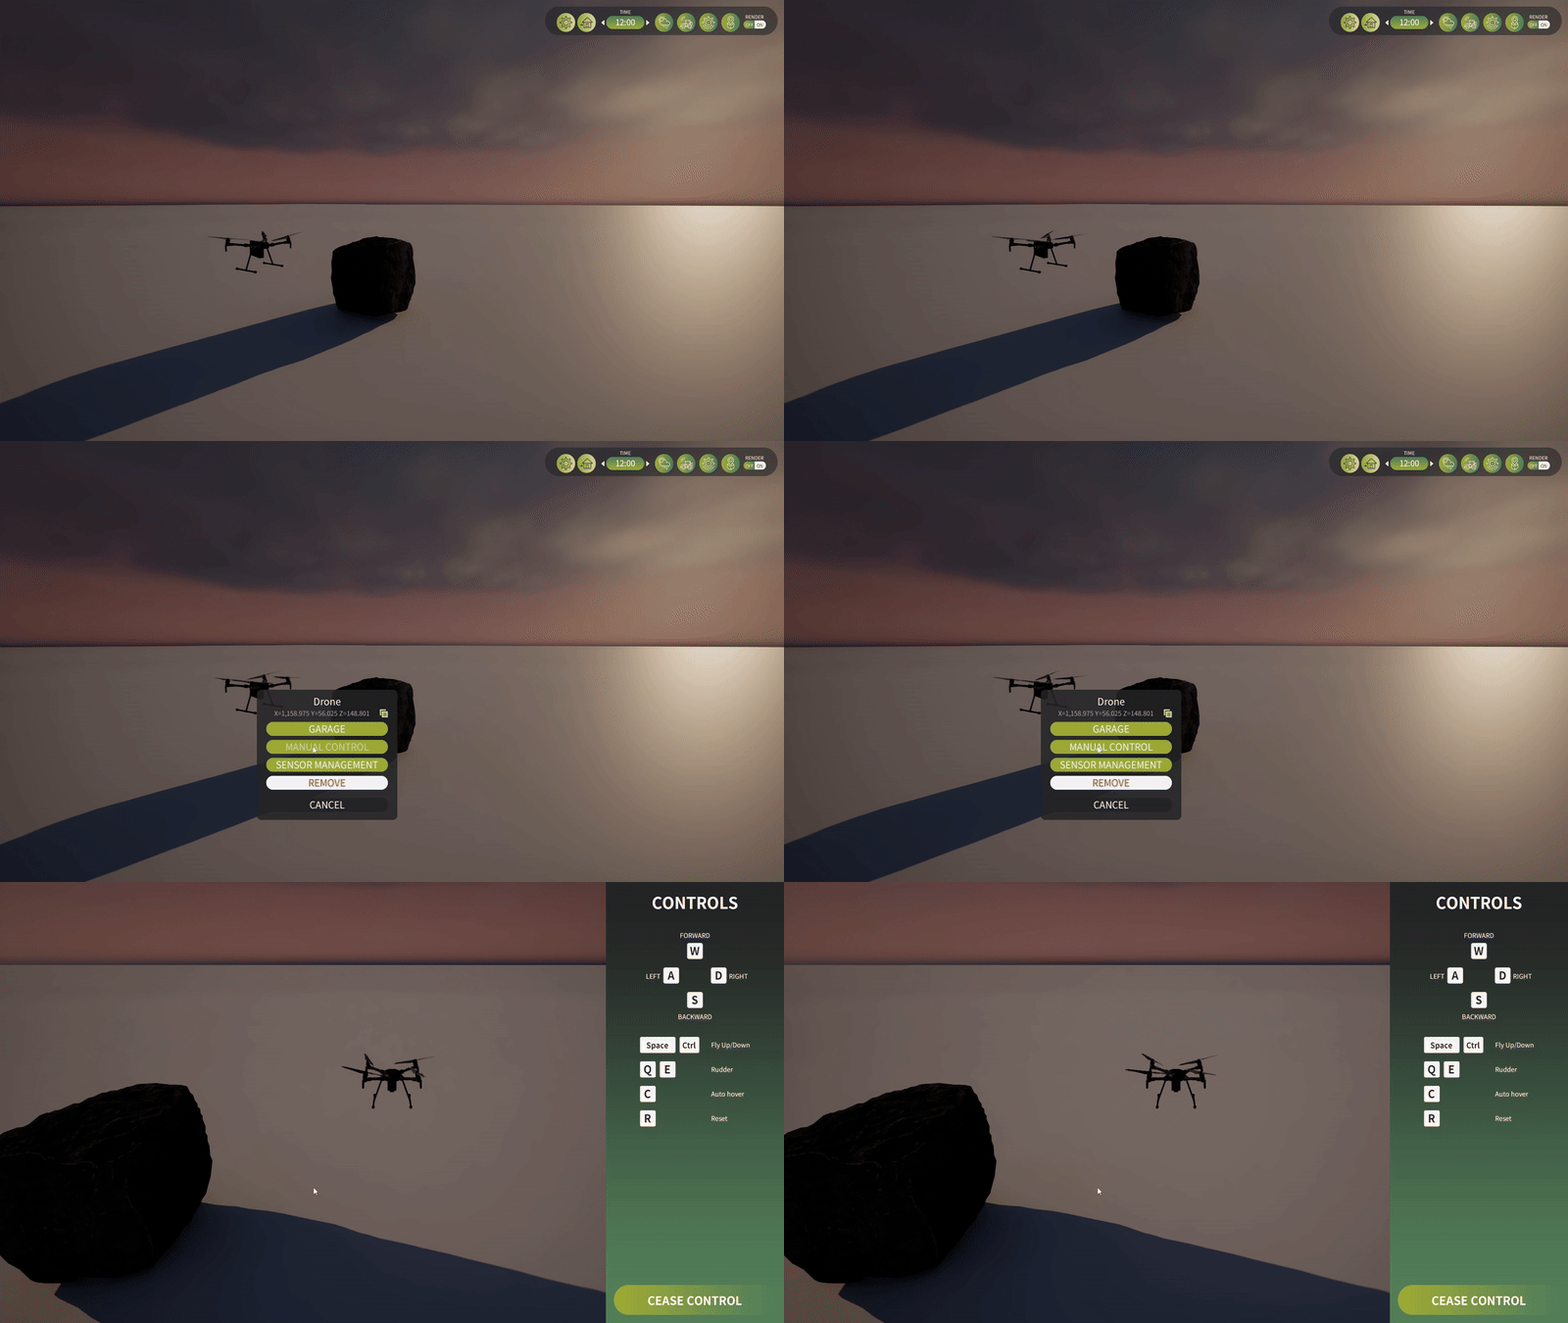
Spawn drone either through user interface or ROS. Then right click vehicle and select 'Manual Control' from the context menu. This will attach Spectator camera to the vehicle and allows you drive the vehicle manually.

Inputs for driving forward is WASD
W = Forward
S = Backward / break

A = Turn left
D = Turn right

Q = Rudder left
E = Rudder right

Space = Fly up
Ctrl = Fly down

C = Auto Hover
R = Reset Drone
Drone ROS topics
Each drone publishes several ROS topics:
# query all ROS topics
rostopic list
# In ROS topic that takes in "geometry_msgs/Twist" to move the drone
/agrarsense/in/vehicles/drone/movement
# Out ROS topic that publishes drone location and rotation in the world
/agrarsense/out/vehicles/drone/transform
# Out ROS topic that publishes drone GPS coordinates in the real world
/agrarsense/out/vehicles/drone/navsatfix
# Out ROS topic that publishes drone's height from the ground
/agrarsense/out/vehicles/drone/height
# Out ROS topic that publishes drone's collisions
/agrarsense/out/vehicles/drone/collision
# Out ROS topic that publishes when drone overlaps objects such as trees
/agrarsense/out/vehicles/drone/overlap
# Out ROS topic that publishes when drone overlaps objects such as trees
/agrarsense/out/vehicles/drone/inner_overlap
Flying Drone through ROS
- Continuous message to agrarsense/in/vehicles/VEHICLE_ID/movement (Twist message)
- Drone movement is divided in 2 sections, Angular and Linear
- Angular is for the side to side and forward and backward movements
Linear is for the ruddder and up / down movements
Breakdown:
Linear.x = NOT USED Linear.y = Drone rudder left / right (value = -1 to 1) Linear.z = Drone up / down (value = -1 to 1)
Angular.x = Drone left / right tilt (value = -1 to 1) Angular.y = Drone forwards / backwards (value = -1 to 1) Angular.z = NOT USED
Example of moving drone through ROS:
rostopic pub /agrarsense/in/vehicles/drone/movement geometry_msgs/Twist [0,0,0] [0,1,0] -r 30
This has to be continuous movement in order to move the drone in every tick.
Adding Sensors to Drone
You can add Sensors to Drone via user interface, which you can then save into preset (shows in garage preset) or export into .json file so it can be re-used easily without needing to setup the Drone each time.
1) Spawn Drone via user interface or via ROS.
2) Right click the Drone and context menu should appear.
3) Click "Move to Garage"
4) Setup sensors in "Garage". Check Setup Sensors on how to setup the sensors.
5) To export Drone and its sensor(s) click Export.
.json file will be exported to SIMULATION_ROOT/Data/ExportedJsonFiles/ and it will look something like below.
Note. You can also export vehicle to json through vehicle "Open Parameters menu".
{
"objects": [
{
"type": "vehicle",
"model": "Drone",
"id": "drone",
"teleportSpectator": false,
"followObject": false,
"destroyOverlappingObjects": false,
"hideVehicleMeshForCameras": false,
"spawnPoint": {
"x": 0,
"y": 0,
"z": 200,
"roll": 0,
"pitch": 0,
"yaw": 0,
"scaleX": 1,
"scaleY": 1,
"scaleZ": 1
},
"parameters": {
"droneAction": "Roaming",
"DroneEndAction": "Stop",
"collisionsEnabled": true,
"OverlapRadiusMeters": 25.0,
"createInnerOverlapSensor": true,
"innerOverlapRadiusMeters": 8.0,
"visualizeOverlap": false,
"showForwardArrow": false,
"droneSlowToPointModifier": 1.0
},
"sensors": [
{
"type": "sensor",
"model": "RGBCamera",
"name": "rgbcamera",
"id": "rgbcamera",
"attachedToComponent": "SkeletalMesh",
"attachedToBone": "base",
"useGimbal": true,
"spawnPoint": {
"x": 6.4605301776318811,
"y": 0.63622325574397109,
"z": 20.747438007208984,
"roll": -1.6560397853027093e-07,
"pitch": -9.391856679030747e-07,
"yaw": 10.000001907348519,
"scaleX": 1,
"scaleY": 1,
"scaleZ": 1
},
"parameters": {
"postProcessingEffects": true,
"enable16BitFormat": true,
"useHDR": false,
"width": 1280,
"height": 720,
"maxViewDistanceInCmOverride": -1.0,
"fOV": 90,
"targetGamma": 1,
"shutterSpeed": 60,
"iSO": 100,
"focalDistance": 0,
"depthBlurAmount": 1,
"depthBlurRadius": 0,
"dofMinFStop": 1.2000000476837158,
"dofBladeCount": 5,
"filmSlope": 0.87999999523162842,
"filmToe": 0.55000001192092896,
"filmShoulder": 0.25999999046325684,
"filmBlackClip": 0,
"filmWhiteClip": 0.039999999105930328,
"exposureMinBrightness": -2,
"exposureMaxBrightness": 20,
"exposureSpeedUp": 10,
"exposureSpeedDown": 1,
"motionBlurIntensity": 0,
"motionBlurMax": 2,
"motionBlurMinObjSize": 0,
"lensFlareIntensity": 0,
"bloomIntensity": 0,
"whiteTemp": 6500,
"whiteTint": 0,
"chromAberrIntensity": 0,
"chromAberrOffset": 0,
"aperture": 4,
"saveImageToDisk": false,
"sendDataToROS": true,
"targetFrameRate": 0,
"usePhysicLensDistortionEffect": true,
"useTemporalAA": true,
"useIceLensEffect": false,
"iceLensEffectStrength": 0.30000001192092896,
"iceLensEffectAngle": 1
}
}
]
}
]
}
Spawning Roaming Drone
Example .json structure below.
The Drone will roam randomly around the map until it is destroyed, or it receives controls commands through ROS.
{
"objects": [
{
"type": "Vehicle",
"model": "Drone",
"id": "drone",
"teleportSpectator": false,
"followObject": false,
"hideVehicleMeshForCameras": false,
"spawnPoint": {
"x": 0.0,
"y": 0.0,
"z": 200.0,
"roll": 0.0,
"pitch": 0.0,
"yaw": 0.0
},
"parameters": {
"droneAction": "Roaming",
"DroneEndAction": "Stop",
"collisionsEnabled": true,
"overlapRadiusMeters": 25.0,
"createInnerOverlapSensor": true,
"innerOverlapRadiusMeters": 8.0,
"visualizeOverlap": false,
"showForwardArrow": false,
"droneSlowToPointModifier": 1.0
}
}
]
}
Spawning Follow Path Drone
Example .json structure below.
Drone will follow the given path until it is gets to the end, and if the droneEndAction is "Destroy" it will destroy itself.
If the drone receives any controls commands through ROS while following the given path, drone will stop following the given path.
{
"objects": [
{
"description": "Spawns a drone that follows given points path."
},
{
"type": "Vehicle",
"model": "Drone",
"id": "drone",
"teleportSpectator": false,
"followObject": false,
"hideVehicleMeshForCameras": false,
"spawnPoint": {
"x": 0.0,
"y": 0.0,
"z": 200.0,
"roll": 0.0,
"pitch": 0.0,
"yaw": 0.0
},
"parameters": {
"droneAction": "FollowPath",
"droneEndAction": "Destroy",
"collisionsEnabled": true,
"overlapRadiusMeters": 25.0,
"createInnerOverlapSensor": true,
"innerOverlapRadiusMeters": 8.0,
"visualizeOverlap": false,
"showForwardArrow": false,
"droneSlowToPointModifier": 1.0,
"points": {
"point0": {
"x": 51.986604,
"y": 199.239354,
"z": 216.516768,
"roll": 0.0,
"pitch": 0.0,
"yaw": 0.0
},
"point1": {
"x": 384.547158,
"y": -4204.359581,
"z": 216.516621,
"roll": 0.0,
"pitch": 0.0,
"yaw": 0.0
},
"point2": {
"x": 4318.762627,
"y": -4204.359581,
"z": 216.516671,
"roll": 0.0,
"pitch": 0.0,
"yaw": 0.0
},
"point3": {
"x": 4318.762627,
"y": 199.239354,
"z": 216.516776,
"roll": 0.0,
"pitch": 0.0,
"yaw": 0.0
}
}
}
}
]
}
Controlling the Drone through ROS
Controlling the drone when manual flightmode happens in /agrarsense/in/vehicles/BP_Drone_C_0/Movement Topic Message type is geometry_msgs/Twist:
- Vector3 linear
- Vector3 angular
Linear controls the Roll, Angular controls the Pitch and Yaw
(Example moving script in Agrarsense\Examples\ROS1\drone_movement.py)
To move Drone another location, you can utilize ROS Commands topic MoveDroneTo drone {x,y,z} ROS Command.
# For example on Windows
# ROS1
rostopic pub /agrarsense/in/commands std_msgs/String "MoveDroneTo drone 300,200,5000" --once
# ROS2
rostopic pub /agrarsense/in/commands std_msgs/String "data: MoveDroneTo drone 300,200,5000" --once
It will automatically override roaming mode to head to this position.
Other Drone ROS Commands
Parameters
ID: Identifier of the drone actor
X, Y, Z: Target destination coordinates
Available Commands
MoveDroneToAndDestroy {ID} {X,Y,Z}
Moves the drone to the specified location and destroys it upon arrival.
# ROS1
rostopic pub /agrarsense/in/commands std_msgs/String "MoveDroneToAndDestroy drone 300,200,5000" --once
# ROS 2
rostopic pub /agrarsense/in/commands std_msgs/String "data: MoveDroneToAndDestroy drone 300,200,5000" --once
StopDrone {ID}
Immediately pauses the drone's movement.
# ROS1
rostopic pub /agrarsense/in/commands std_msgs/String "StopDrone drone" --once
# ROS2
rostopic pub /agrarsense/in/commands std_msgs/String "data: StopDrone drone" --once
ResumeDrone {ID}
Resumes movement for a previously stopped drone.
# ROS1
rostopic pub /agrarsense/in/commands std_msgs/String "ResumeDrone drone" --once
# ROS 2
rostopic pub /agrarsense/in/commands std_msgs/String "data: ResumeDrone drone" --once
TeleportById {ID} {X,Y,Z}
Instantly teleports the drone to the specified coordinates.
# ROS1
rostopic pub /agrarsense/in/commands std_msgs/String "TeleportById drone 100,150,2000" --once
# ROS2
rostopic pub /agrarsense/in/commands std_msgs/String "data: TeleportById drone 100,150,2000" --once


